

 Shawn Peterson·Mar 8, 2026 1:21:59 PM

How to Create HubSpot CTAs (Calls-to-Action)
A comprehensive guide to building high-converting buttons, banners, and pop-ups in HubSpot.
In the world of inbound marketing, a Call-to-Action (CTA) is the bridge between a casual visitor and a qualified lead. HubSpot’s robust CTA tool allows you to create everything from simple buttons to sophisticated slide-in banners and pop-up boxes that capture attention at just the right moment. Whether you are hosting a webinar, offering a whitepaper, or simply encouraging a consultation, mastering the CTA editor is essential for driving conversions on your website and in your marketing emails.
✅ Key Takeaways
- HubSpot supports multiple CTA types including banners, pop-up boxes, slide-ins, and embedded buttons.
- You can use drag-and-drop modules to customize content with videos, forms, and meeting links.
- Advanced targeting allows you to trigger CTAs based on exit intent, scroll percentage, or inactivity.
- External site usage requires the HubSpot tracking code or WordPress plugin installation.
- Smart content features allow you to show different CTAs to different visitors based on their lifecycle stage or list membership.
Choose Your CTA Type
To begin, navigate to Marketing > CTAs in your HubSpot account and click Create in the top right corner. You will be presented with two primary categories of CTAs, each serving a different purpose in the user journey:
- Pop-ups: These include Banners (fixed to top/bottom), Pop-up boxes (centered), and Slide-ins (appearing from a corner).
- Embeds and Buttons: These are standard buttons or "Embedded Image" CTAs that you can place directly within blog posts, landing pages, or HubSpot emails.
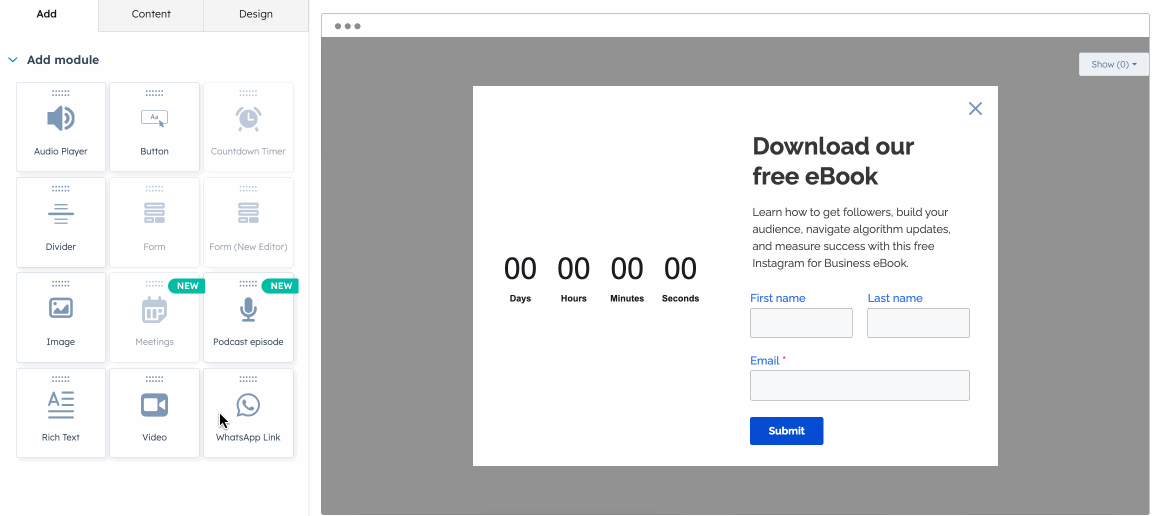
Design with Drag-and-Drop
Once you select a template, you enter the CTA editor. This interface allows you to add various modules like text, images, buttons, and even video. To modify the layout, simply hover over a module to move, clone, or delete it. This flexibility ensures your CTA matches your brand's visual identity perfectly.
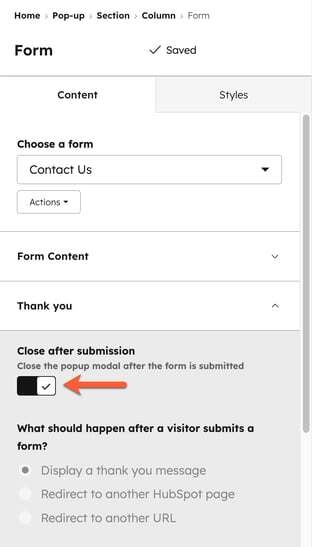
If you are using a form module within your CTA, you can streamline the user experience by enabling specific post-submission behaviors. For example, you can toggle the "Close after submission" switch to ensure the pop-up disappears once the visitor has converted.
💡 Pro Tip: You can only add one Form or one Meeting module to a single CTA. If you need both, consider linking the CTA button to a dedicated landing page instead.
Design a HTML CTA
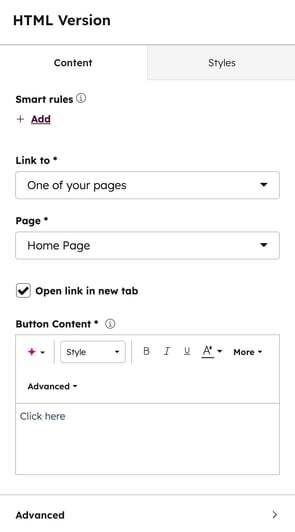
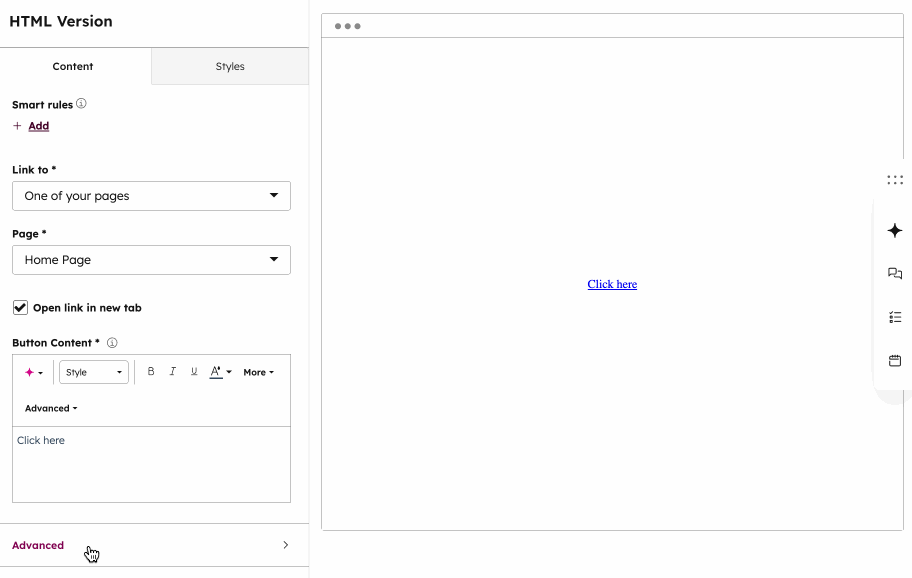
For more advanced users who want total control over the styling, HubSpot offers HTML CTAs. This allows you to write custom code for your buttons or slide-ins, providing a level of customization that goes beyond the standard drag-and-drop modules. You can enter your specific button content and text directly into the designated fields.
Beyond the content itself, the HTML editor allows for "Custom CSS." You can add styles without necessarily needing a selector (e.g., simply color: yellow;). This is particularly useful for achieving unique hover effects or specific brand alignments that require code-level precision.
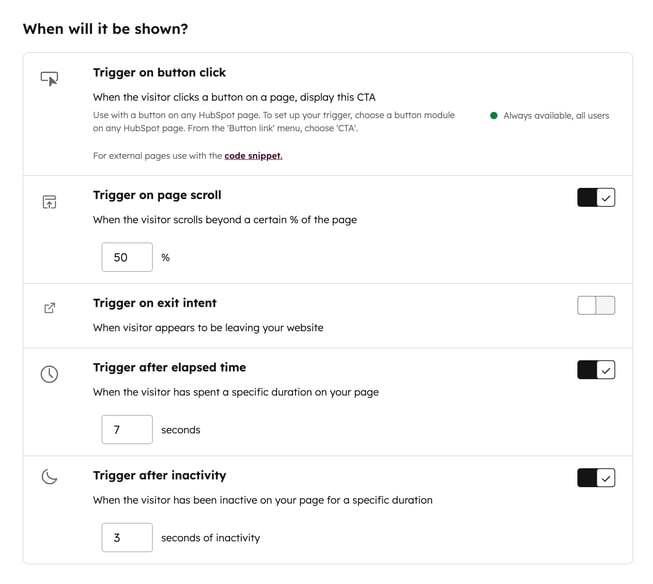
Set Activation Triggers
Timing is everything. In the Targeting tab, you can decide exactly when your CTA should appear to a visitor. HubSpot provides several trigger options to ensure the CTA is helpful rather than intrusive:
- On scroll: Trigger the CTA once the visitor has scrolled through a certain percentage of the page.
- Exit intent: Show the CTA when the visitor's cursor moves toward closing the tab.
- After inactivity: Display the CTA if the visitor has been idle for a specific number of seconds.
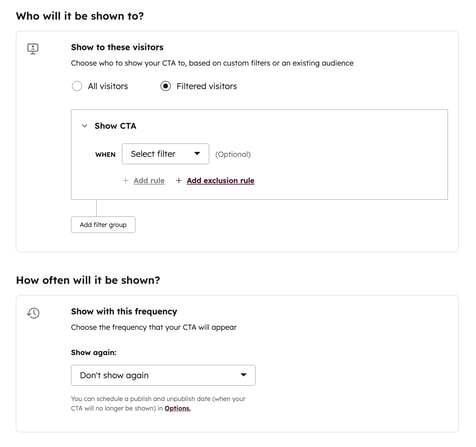
Define Visitors and Frequency
You don't want to annoy repeat visitors by showing the same pop-up every time they refresh the page. Within the targeting settings, you can control the frequency. Options include "Don't show again" (ideal for one-time offers) or specified intervals. This ensures your CTA remains a conversion tool rather than a nuisance.
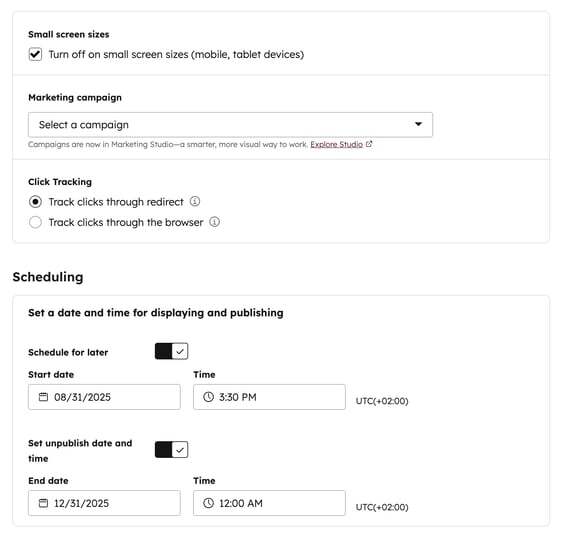
Finalize CTA Options
Before publishing, check the additional options tab. Here you can name your CTA for internal tracking, assign it to a HubSpot campaign, and even set an unpublish date. This is critical for time-sensitive promotions like holiday sales or webinar registrations—once the date passes, HubSpot will automatically stop displaying the CTA.
❓ Frequently Asked Questions
Can I use HubSpot CTAs on a non-HubSpot website?
Yes. You must either install the HubSpot tracking code on your external site or use the HubSpot WordPress plugin if you are on the WordPress platform.
What is the difference between an Embedded CTA and a Pop-up?
Embedded CTAs are static elements (like a button) placed permanently on a page. Pop-ups are dynamic elements (like banners or slide-ins) that appear based on specific triggers or timing.
How do I make my CTA mobile-friendly?
In the CTA options, you can choose to enable a responsive layout or hide the CTA entirely on small screens if it might negatively impact the mobile user experience.