
 Shawn Peterson·Mar 8, 2026 1:22:04 PM

How to Set Up HubSpot Chatflows and Live Chat
By Technical Documentation Team • Updated January 12, 2026
In today’s fast-paced digital landscape, customers expect immediate responses. HubSpot’s Chatflows and Live Chat tools allow you to bridge the gap between your team and your website visitors in real-time. Whether you are aiming to connect a lead on your pricing page directly to a sales representative or provide instant support on your knowledge base, a well-configured chatflow ensures your business is always accessible. This guide will walk you through the end-to-end process of building a professional chat experience that drives engagement and customer satisfaction.
✅ Key Takeaways
- Learn how to initialize and brand your HubSpot chat widget.
- Configure availability settings based on team hours or user presence.
- Set up advanced targeting rules to show specific chats on certain pages.
- Manage GDRP and data privacy consent directly within the chat interface.
- Assign incoming conversations to the right teams automatically.
Initiate the Chatflow Setup
To begin, login to your HubSpot portal. Navigate to the Service tab in the main navigation bar and select Chatflows. If your website is hosted externally (e.g., on WordPress or Shopify), ensure your HubSpot tracking code is installed, or the chat widget will not appear.
In the upper right corner, click Create chatflow and select Website. If this is your first time, HubSpot will prompt you with a "Set up chat" dialog to establish your global widget settings.
Configure Widget Display and Branding
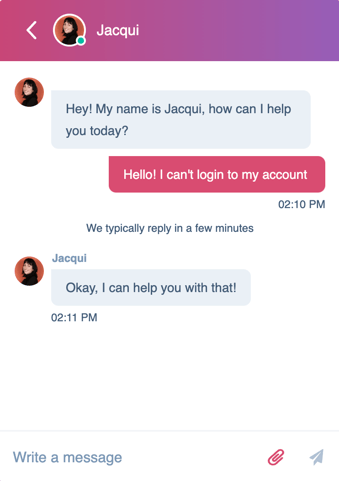
On the Display tab, you will choose the visual identity of your chat. Select an accent color that matches your brand guidelines. You can also customize the chat heading (choosing between specific users or a generic team name) and upload an avatar.
💡 Pro Tip: Use a welcome message that sets expectations. For example, "Hi there! Our team typically replies in under 5 minutes" helps reduce visitor frustration.
Define Your Team's Availability
The Availability tab is crucial for managing customer expectations. You have three primary options:
- Based on user availability: The chat only appears if a specific team member is logged in and set to "Available."
- Based on chat operating hours: You set specific business hours (e.g., 9 AM - 5 PM).
- Chat is available 24/7: The widget is always active regardless of team status.
Don't forget to set your "Away" and "Offline" behaviors. You can choose to show an away message or hide the chat launcher entirely during non-business hours.
Set Up Your Targeting Rules
Targeting rules allow you to control exactly which visitors see which chatflow. For example, you might want a specialized "Sales Chat" to appear only on your pricing page, and a "Technical Support" chat on your help documentation. Use "And" and "Or" logic to create specific filters based on URL, visitor behavior, or contact properties.
Manage Data Privacy and Consent
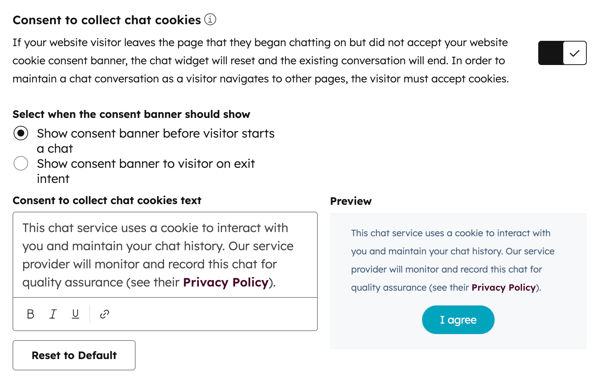
Compliance is a priority. Under the Options tab, you can enable "Consent to collect chat cookies." This ensures that you are following GDPR and other privacy regulations by informing the user that their data is being tracked to facilitate the chat session.
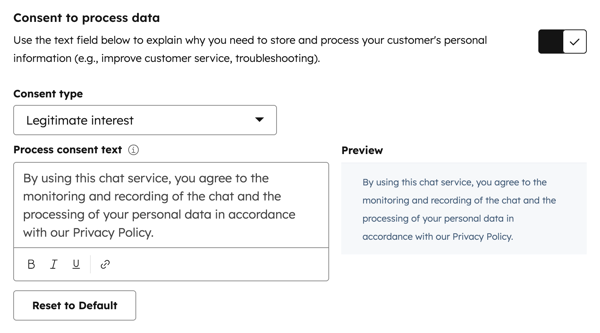
Additionally, you can toggle "Consent to process data" to require visitors to explicitly allow your team to store their personal information before starting a conversation. You can link your Privacy Policy directly in this field.
❓ Frequently Asked Questions
Why isn't my chat widget appearing on my site?
The most common reason is a missing tracking code. If your site isn't on HubSpot, you must manually install the JavaScript code. Also, check your targeting rules to ensure you haven't accidentally excluded the page you are viewing.
Can I route chats to specific teams?
Yes. In the Chatflow tab, use the "Assign incoming tickets to" dropdown to select specific users or teams. This ensures the right experts handle the right inquiries.
What is the difference between a chatbot and live chat?
Live chat connects visitors directly to a human agent in real-time. A chatbot uses automated "rule-based" logic to answer common questions or gather lead information before a human gets involved.